Setting up local environments for PHP frameworks can be tricky especially on Macs. Macs run PHP and Apache natively, so I always have issues trying to use Xampp or Mamp. Local by FlyWheel is a good option, but your root project folder is hard to track down as they put it in the root directory of the Mac.
Using Docksal solved these issues for me. Launch a project stack with Docksal on Docker and your local server is up and running. That easy!
What is Docksal?
Docksal is like an add-on to Docker that will install all the needed Docker "Volumes" and creates the project "Container" for you. It also has quick-start, boilerplate configurations for all the major PHP frameworks like WordPress, Drupal, Laravel and Magento using the fin create project command.
Why use Docksal?
- Using Docker is a more efficient way to run local environments on your machine. Docksal sets up projects faster by handling the Docker configurations for you.
- By using Docksal and Docker we can create our project folder anywhere.
- Environment setup and configurations will be the same across different machines, making collaboration development more efficient.
Setup WordPress with Docksal
First we will need to get Docker installed and running, then we can install and run Docksal. This procedure will be pretty much the same for installing Drupal or many of the other PHP frameworks.
This video will walk through the post in more detail if needed.
1.Install Docker
Installing Docker is easy. Just go to Docker Desktop, choose your operating system and download Docker Desktop. Follow the download instructions and open Docker.
It will then be running in the background, and will be ready for Docksal.
2.Install Docksal
Docksal has great documentation and uses the command line for installation. First, go to Docksal Setup and find your operating system.
Then scroll down to MacOS with Docker Desktop, or Windows for PC users. You can also install Docker from here and skip step 1. Then, follow the instructions to open your terminal and run the bash command. Now we are ready to initialize Docksal and install WordPress
3.Run Docksal
Docksal will handle the Docker local environment stack for us - which is really nice!
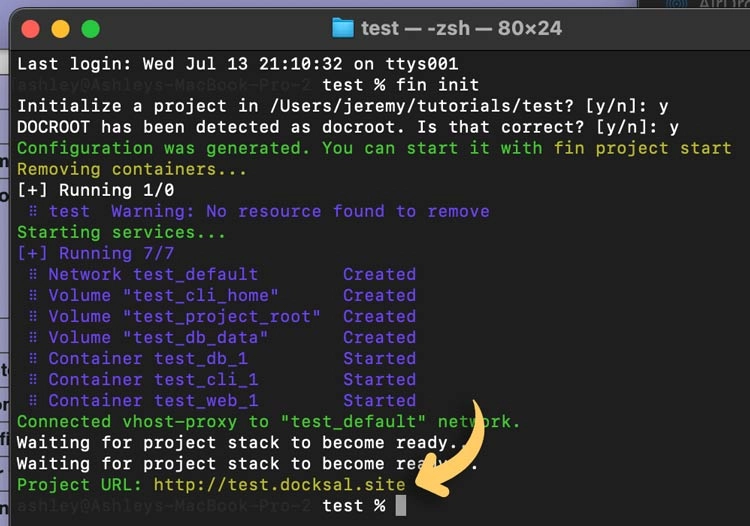
First, we are going to create our project folder where every you want. Then in that folder, open your terminal and run fin init following the Project Setup instructions. Docksal will create the Docker Container, Volumes and handle all of the configurations for us.
Now we can right click on the Project URL and "open link" in a new browser tab.

We should see the PHP Version index.php test page that Docksal created with the "docroot" folder inside our project folder. Now our database and server are up and running, and we are ready to install WordPress.
4.Install WordPress
From here, we can download WordPress from wordpress.org and paste the WordPress files into the "docroot" folder inside our project folder that Docksal created. Be sure to delete or replace the index.php test file that Docksal put inside the "docroot" folder.
How it Works
If we open Docker Desktop > Container / Apps there is a new project container running with our project name. In Images you can see all the environments Docksal brings in for us. This would be no small feat to manually do without Docksal.
Removing Projects
To remove a project, just delete the "docroot" folder and the hidden .docksal folder in our project folder, and trash the Docker container for that project.
Working with Docksal
Now that we have our local environment setup and running we can use fin stop and fin start to stop and start the server.
Docksal uses the fin alias for its commands and has all of the command options on their Fin Help page. There are many command line options, like: viewing your configuration by running fin config show and exporting your database by running fin db dump ~/dump.sql.
Final Thoughts
By using Docksal with Docker, we get to use all the features of Docker with out the extensive experience it takes to set it up. If you aren't ready to take the big step of making Docker your primary tool, this is a good step in the right direction.